Not quite an open source specific tutorial – however Amazon Web Services has been a platform of cloud services that cater to many enterprises with open source utilization. In this guide, we will show you how to setup Route53 to use your own domain name as the nameservers (eg. ns1.yourdomain.com) rather than nameservers provided by AWS (eg. ns-186.awsdns-23.com).
The Prerequisite
To create a vanity (whitelabel) nameservers such as ns1.yourdomain.com, you will not be able to accomplish it within AWS Web Console – it requires AWS CLI tools. Please make sure you have it installed and configured with the correct authorization on your computer.
Create a reusable delegation set
We will start by creating a delegation set that we can reuse for all the domain name you want to use the nameservers for. In this example, we will use NS.001 as the caller reference.
aws route53 create-reusable-delegation-set --caller-reference NS.001You will see an output such as
https://route53.amazonaws.com/2013-04-01/delegationset/N308U4GH5KEWDI
DELEGATIONSET	NS.001	/delegationset/N308U4GH5KEWDI
NAMESERVERS	ns-1292.awsdns-33.org
NAMESERVERS	ns-1814.awsdns-34.co.uk
NAMESERVERS	ns-465.awsdns-58.com
NAMESERVERS	ns-610.awsdns-12.net
The important thing is to take note of this string and keep it as a note somewhere – you will need this in the future to use the same nameservers. In this case, the delegation set ID is N308U4GH5KEWDI
/delegationset/N308U4GH5KEWDINext, we will be creating record for the vanity nameservers – to do so, we will have to find out the IP address of the four nameservers assigned to your delegation ID.
In this example, the nameservers assigned are ns-1292.awsdns-33.org, ns-1814.awsdns-34.co.uk, ns-465.awsdns-58.com, and ns-610.awsdns-12.net.
dig +short ns-1292.awsdns-33.orgIt will then output the IP address resolving to this nameserver – which is 205.251.197.12 – we will then do the same for the other three nameservers assigned.
You will need to add “host names” such as ns1.yourdomain.com, ns2.yourdomain.com and so on with your domain registar. I will not touch base on this part, but each registar has its own way and guide on how to accomplish this (eg. GoDaddy – How to add my own host names)
Creating a hosted zone using a reusable delegation set
Let’s start by creating a hosted zone with the vanity nameservers domain you would like to you. We will use yourdomain.com as an example. This time the caller reference will be using NS.002 (it has to be different from the caller reference you use to create reusable delegation set. Note that we are using the same delegation set ID (N308U4GH5KEWDI)
aws route53 create-hosted-zone --caller-reference NS.002 --name YOURDOMAIN.COM --delegation-set-id /delegationset/N308U4GH5KEWDIYou will then see an output like this
https://route53.amazonaws.com/2013-04-01/hostedzone/Z2UM1Y4TFOJCBC
CHANGEINFO	/change/C3K7BKALK4N078	PENDING	2018-09-20T13:09:25.732Z
DELEGATIONSET	NS.001	/delegationset/N308U4GH5KEWDI
NAMESERVERS	ns-1292.awsdns-33.org
NAMESERVERS	ns-1814.awsdns-34.co.uk
NAMESERVERS	ns-465.awsdns-58.com
NAMESERVERS	ns-610.awsdns-12.net
HOSTEDZONE	NS.002	/hostedzone/Z2UM1Y4TFOJCBC	yourdomain.com.	2
CONFIG	False
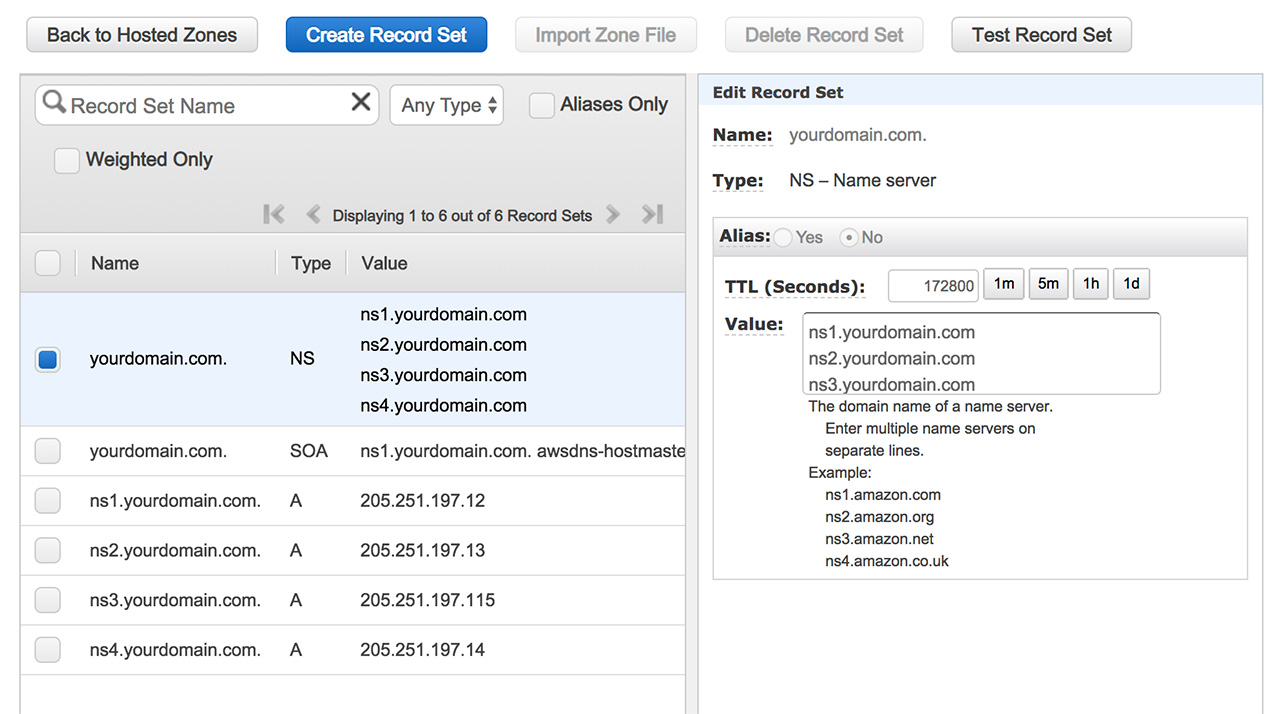
Once this has been completed, you can login to your AWS Route53 console and start editing the record sets. Start by adding A record sets for ns1.yourdomain.com (using the IP address you extract with dig command above) and change your NS records with your vanity nameservers, Remember to also update your SOA to reflect the correct nameserver.
In the future, if you forgotten your delegation set ID, you can retrieve them by using this command
aws route53 list-reusable-delegation-setsFinal Thoughts
While the process seems to be complicated, it is actually quite straight forward once you have the delegation sets and hostname setup on your registar. You can re-use it for other domain name without making any changes to the primary vanity nameservers record sets. If you have any comment or suggestions, feel free to share them on the comment section below. We hope this tutorial is useful to you.


I followed the same steps and added my name servers like ns1.example.com and so on but, when we click on hosted zone from hosted zone list ,on right side panel “Hosted Zone details” its showing previous name servers.
You have to edit that yourself